Blog
Using Kentico 12 MVC with Azure DevOps.
Ridgeway
Keeping your team and your project stakeholders up to date with the current state of the project is a great way to reinforce collaboration throughout a project and keep things on track. Using Microsoft Azure Devops with the Continuous Integration module in Kentico 12 gives us the ability to automate a regular deployment to a shared build server.
There are a great many articles about using Continuous Integration (CI) and Continuous Deployment (CD) available on the web that you can find with a quick Google search. Most articles concern database schema updates and deploying your code as a quick start, leaving you as a developer to work on any specific requirements for your scenario. Typically, platforms like Kentico require a little more effort because the database not only has a schema to update, but also data itself. Making sure that we update the right data is a pretty big deal, get that wrong and your document IDs are misaligned, and you have the potential to delete transactional data or make the wrong records available to the wrong people.
At Ridgeway we've primarily focussed on manual deployments in the past, making use of Kentico export packages and code deployments to ensure that we know exactly what we're deploying at each point. How we have been doing that is detailed in an article I wrote last year about Using Kentico CI and Git to help with releases. This worked well for us, but it was still time consuming to update a build server and required more manual intervention than we liked. So we set out on a journey to see if we could automate that build server using the Kentico Continuous Integration module and Azure DevOps. This is also a topic that I was lucky enough to be able to present at the 2019 Kentico Connection in Brno, Czechia.
What is the Continuous Integration Module?
The Kentico CI module is a feature that was added to the Kentico EMS license in Version 9 (yep - back in November of 2015 if you can remember that far back!). At its simplest enabling the CI module means that any changes that you make in Kentico are serialised in to XML files that are located in CMS\App_Data\CIRepository. The CI tool can be run to deserialise these files into the current Kentico instance to apply any changes that have been made.
What this gave us was a simple way for developers to work on completely isolated environments with their own database set up locally so they didn't have to wait for changes to be applied and there is no network lag. Pulling the latest code from the source repository and running the CI tool updates your local DB, bringing you in-line with the rest of the team. We have used this at Ridgeway for quite a few years now to synchronise developers across new projects and we've learned a few tips and tricks along the way such as how to configure which files are going to be serialised and how different files can be easily created manually if needed to speed up some of the common development jobs.
What is our goal?
The goal here is to set up continuous integration using Microsoft Azure DevOps and Kentico's CI module to create a build site that can be shared to everyone invested in the project (preferably without looking over a developer's shoulder). What we want to avoid doing is deploying files and artefacts to the build site that are not required to run the website, so in this instance we're talking about the continuous integration executable and all of the continuous integration files stored in the CI repository folder.
We want this then to run automatically whenever we push our changes up to our source code repository. For the source code repository we are also going to be using Microsoft Azure DevOps Repositories the reason we've chosen Microsoft Azure DevOps is because this along with GitHub supports one feature that we're going to be using to move some of the artefacts from the source code repository directly into the release pipeline that you don't typically want to publish.
We will use use the Medio Clinic solution as our source project as this is used in the Kentico MVC training courses. I've taken a copy of MedioClinic from GitHub already and done a little house-keeping so that I know that it's ready to publish.
To summarise what we’re going to do:
- Build the MedioClinic solution whenever we push to the build branch
- Initialise the database (if it's not ready for a Kentico site already)
- Deploy our Azure App Services
- Run the Kentico Continuous Integration module
Creating the DevOps Build
When it comes to setting up the build in DevOps we've got two parts to the build. The first is the actual build pipeline itself which is going to be responsible for building the assemblies and doing all the compilation. In a typical project at Ridgeway that's also taking care of building any front-end assets using npm etc...... The second thing that we're looking at is the release pipeline. It is the release pipeline's job to take the assets from the build pipeline and publish those to our Azure app service and ensure that the database is upto date.
In this example, the build pipeline will initialise itself from the trigger of something being pushed into the master branch in source control and then the release pipeline will run itself off the trigger of the build pipeline successfully completing. Typically though, the build server would be setup using a chron job so that it runs over-night and would also more likely track a release branch.
Rather than trying to over complicate this particular pipeline right now I’ve created the resources that we need in Azure already; there is a SQL Database Server and black database, an App Service for the Kentico admin site, and another App Service for the customer facing MVC application. The build and release pipelines is then going to take care of everything else.
Build Pipeline
Of the two pipelines that we're using, build is by far the simplest. All we're doing is taking a standard ASP.NET template and making a few small modifications related to how are dealing with connection strings just to simplify our job. Typically, connection strings would be managed in slot configuration but in this instance, I want the connection earlier so that it can be used in our release pipeline to initialise the database, insert licenses, and actually run CI.
Below you can see the yaml file which we're using for this build:
The modified settings of note in the msbuild line are:
- /p:TransformConfigFile=true
- /p:AutoParameterizationWebConfigConnectionStrings=False
These prevent the tokenisation and allow the connection string setting to be present in the built files so that they can be used in the release pipeline.
Release Pipeline
When I first created this there were two options that were available when creating a release pipeline. One is to use the drag and drop interface and the other is to use a Yaml build pipeline, which itself is triggered by the successful completion of another build pipeline. In this example I decided to use drag and drop interface because it gives a better visual representation of what it is that we are trying to receive, though longer term using yaml file is much preferred. I split the release pipeline into two separate stages, the first stage will deal with releasing the administration application and running the Kentico CI as well as database initialisation, the second stage only needs to concern itself with releasing the public facing web application.
As you can see from the diagram below, the release pipeline takes two sets of artefacts. The first set is the output from our build pipeline, this acts as the trigger for the release pipeline to execute while also supplying the built artefacts from the build pipeline. The second artefact set is the raw connection to our source control. This option is only available if you're using either Azure DevOps repositories or GitHub (GitHub is treated as a first-class citizen within Azure DevOps). The purpose of this second set is to give us access to some assets which are not part of the Visual Studio build output. In this instance I'm specifically talking of the CI repository folder and the executable which we will be using to initialise the database.
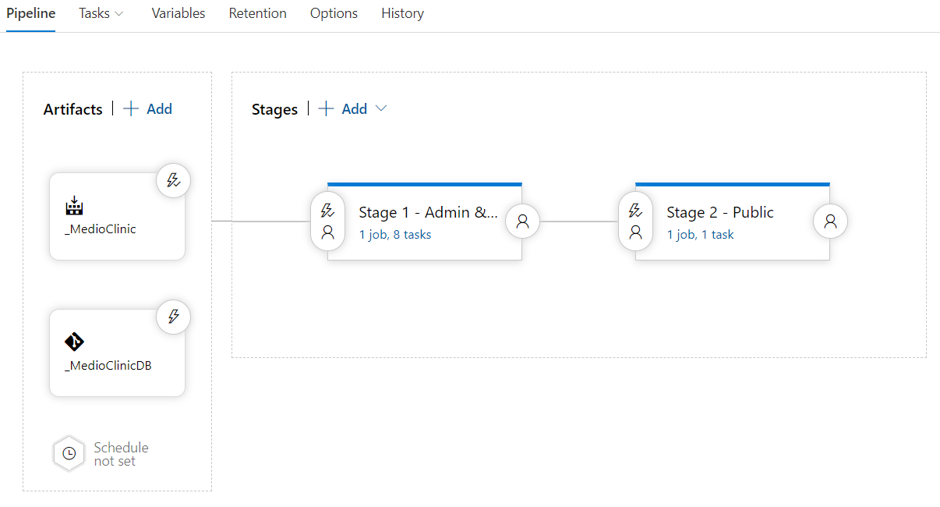
As you can see from the diagram, the first stage contains eight tasks whereas the second stage only takes one. The eight tasks in the first stage are listed below:
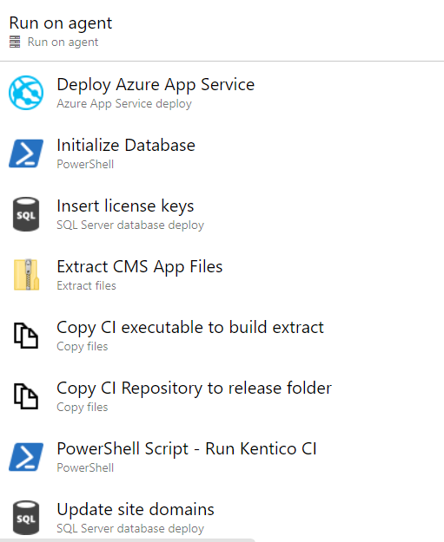
Let's talk through these steps in a little detail.
- The first step is fairly self-explanatory, we're going to take the build output and deploy it to the Azure app service. The settings for this step tell me which part of the output from the build I want, in this case CMSApp.zip and also contained the configuration for sending this up to Azure.
- The second step is a little bit more interesting; this is where we initialise the database. To do this we've built an assembly that takes a few configuration settings and executes the commands that Kentico would typically execute on a new installation. This command looks for the standard Kentico setup scripts and will install all the basic tables and content needed for an empty Kentico installation. I'll put a little more information on how we do this later on.
- Once we have the database initialised, we need to be aware that it won't contain any licence keys for Kentico. Without license keys we won't be able to determine whether the CI module can run. To remedy this for the time being I've created a simple SQL task as the 3rd step in order to insert the licenses I need for Kentico.
- The fourth step unzips the CMS app compilation output from the build pipeline. This is done to aid the CI module executable in running. Without the built assemblies CI will not be able to run correctly. In addition to that this zip file now also contains a functioning configuration file that will be able to tell the CI executable where to look for the database connection string.
- The next two steps I used to extract information from the second artefact source set that we created at the beginning of the release pipeline. The files that we are going to copy are the continuous integration executable as well as its configuration and the CI repository files. These are going to be copied into the location that was created in the previous step. So this continuous integration executable will end up in the bin folder and the continuous integration repository files will end up in the app data folder. We now have everything we need to run continuous integration within the release pipeline.
- The seventh step is a PowerShell command, this is the command that runs ContinuousIntegration.exe with the restore flag set. One thing to note here is that because I do not have continuous integration currently turned on the entire repository is restored at this point so for the sake of the experiment I'm doing here there's quite a lot of information we're deserializing the entire Kentico site. On a bad day, this takes about forty minutes to run on my environment. Forty minutes may seem like quite a long time, but if we are looking at a nightly build then we need not be so concerned. If you want to be running this constantly every time a commit is made then this forty minutes may present more of a challenge to you and some additional effort may need to be made in order to enable continuous integration on the destination server. The obvious downside of doing this is that there is a performance impact on your build server as people tried to work with it and data is serialised to disk.
- This leads us to the final step in this stage, all this needs to do is update the domain names on the site in question. The purpose for this is we're running the entire CI pipeline every time we go through this procedure, that means that the site information itself is also updated. Once the site has initially been setup, we could modify the repository configuration and exclude such things as the site from the CI module meaning that future releases of the pipeline would not update the site record itself.
By the time we get here we should have a fully functional website for the Kentico administration site and all that is left to do is run the second stage of our release pipeline to deploy the MVC application.
Database Setup
In order to initialise the database we're going to make use of some code that comes with Kentico out of the box. If you've ever found yourself in the situation where you're installing Kentico for the first time with a blank database, then you'll have seen some of the output from this code. Specifically what we're talking about is CMS.DataEngine.SqlInstallationHelper.InstallDatabase().
We pass a configuration into this file telling it where to find the configuration files and SQL scripts:
Summary
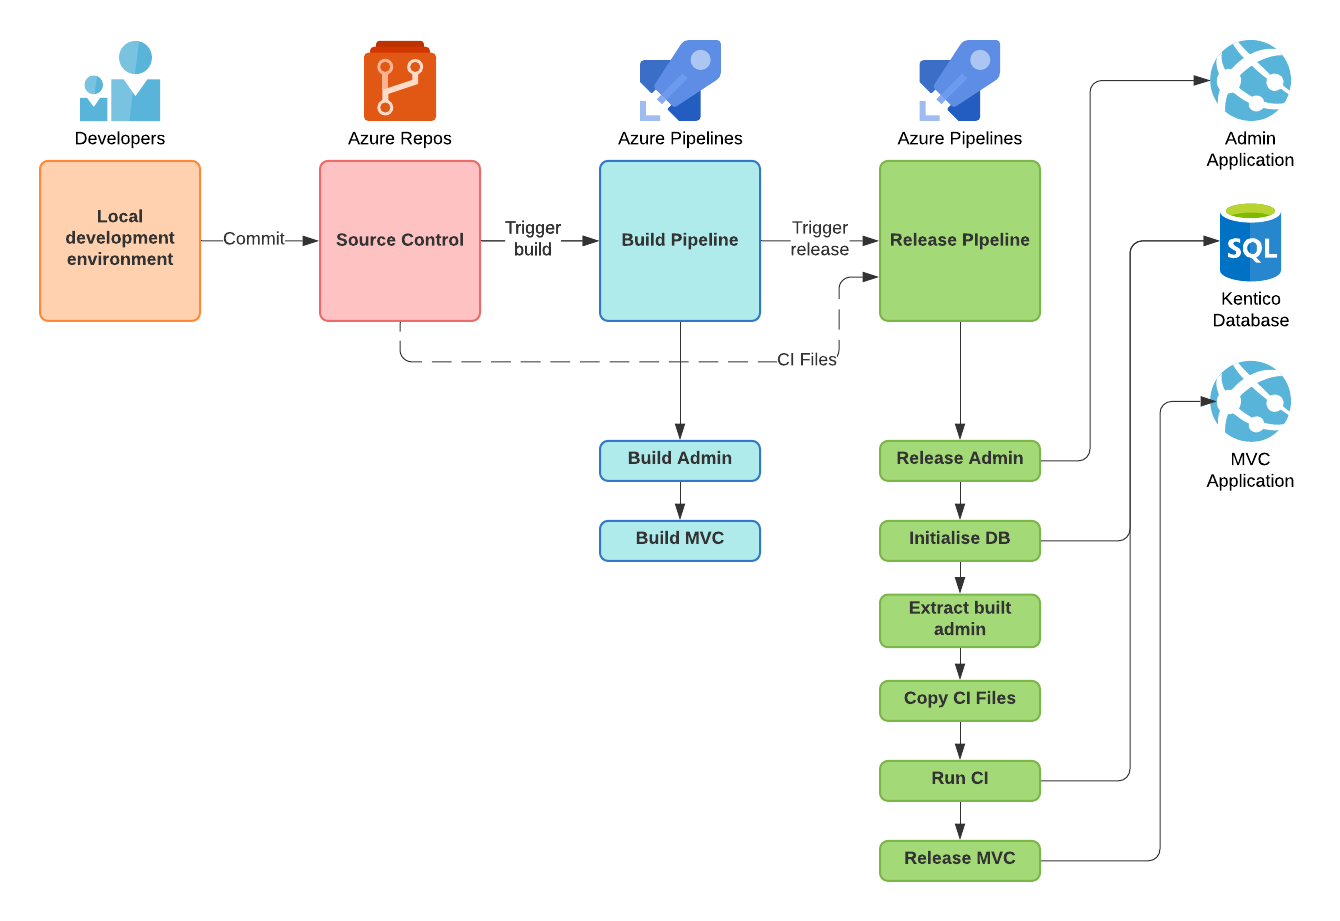
What we’ve got now is a relatively simple pipeline that allow us to keep our build server up to date with minimal developer intervention. We've managed to stick to our original list goals insofar that we've deployed only the web application to the server we haven't deployed any of the continuous integration artefacts themselves, but we have updated the web application with those continuous integration data updates. We have a release process represented by the following diagram.
One thing that we really should take note of here is that this only deals with the process of taking our development environment and moving it into a build server. If we want to take this the next environment (such as UAT, staging environment or perhaps production) this probably isn't the scenario you want to use. In fact the Kentico documentation recommends that you do not use continuous integration itself in production. In part, this is a performance reason but also you have less control over the content and there are better tools for doing this such as the content staging module.
What I hope this has provided is an insight into how you can use Kentico 12 with Microsoft Azure DevOps to quickly push your latest development efforts to a build server where your stakeholders and colleagues can easily view those changes.